You’re window shopping on Amazon, trying to find the best deals.
You land on a product page and everything seems to check out, but you’re not sure if you’re ready to buy yet.
Maybe you don’t have your credit card on you or maybe the deal just isn’t quite good enough.
After navigating away from the site and start seeing advertisements everywhere for that exact same product.
Creepy? I don’t think so.
If you’re new to retargeting, let me be the first to welcome you to this high-converting advertising.
Effective retargeting puts the right product in front customer at the right time.
When done right you can expect some of the highest click through rates, lowest cost per click, and some of the best ROI online advertising has to offer. For example, AdRoll claims retargeting campaigns to produce a 1000% ROI per dollar spent.
And the best part? We are going to have you using Facebook to retarget users in just 4 easy steps.
Setting Up Your Facebook Retargeting
Retargeting can be a bit tricky to set up for the first time because there is some coding involved in order to track website visitors.
Lucky for you, we did the heavy lifting.
1. Within your Facebook Ads Manager and select Audiences
This is where you’ll go to specify the groups of users who’s activity data Facebook Ad Manager will aggregate.
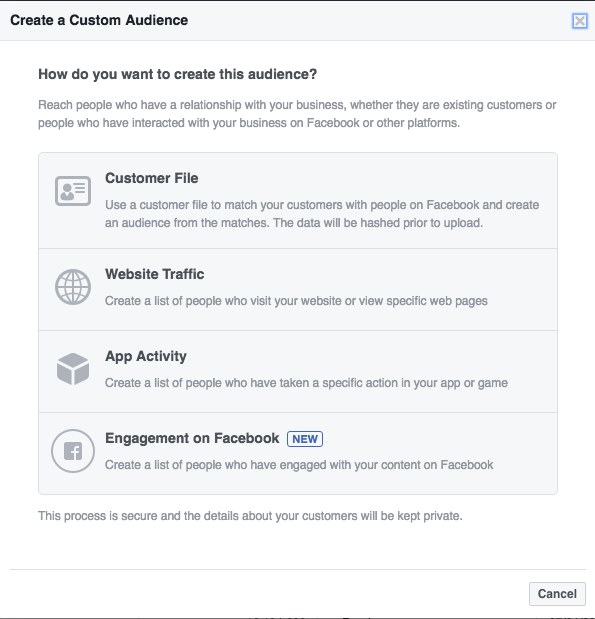
2. Select Create an Audience > Custom Audience > Website Traffic
Although you have other options here, we’re going to select ‘Website Traffic’. Using this audience, your pixel will track every user who has been on certain web pages or taken certain actions.

3. Define Your Audience
Here you can define which type of audiences you want to build.
You have a few options:
- Anyone who visits your website
- People who visit specific pages
- People visiting specific web pages but not others
- People who haven’t visited in a certain amount of time
- Custom combination
For anyone just starting out I would recommend the first option, ‘Anyone who visits your website’. An effective retargeting campaign will usually get a little more specific on the type of audience you build. We’ll dive a little deeper into these options later on in this post.
4. Set Up a Pixel
In order for Facebook to start tracking your website users you will need to set up a pixel on your website if you haven’t already.
Facebook describes this process as follows:
- Click Tools from the top menu
- Click Pixels > Facebook Pixel
- Click Create a Pixel
- Give your pixel a name. There’s only one pixel per ad account, so choose a name that represents your business.
- Click Create Pixel
Voila! All done!
I told you it was going to be easy.
If you’re having trouble getting set up from here, follow along with this video for a visual guide:
Facebook Remarketing Best Practices
Lookalike audiences
Lookalike audiences are a hidden gem in Facebook advertising overlooked by many marketers and, most likely, your competitors. This type of audience enables you to target similar users to those who have already shown interest in your website.
For instance, if a user has frequented your blog, Facebook will build out a group of similar users based on their interests and how they’ve engaged on Facebook. This can be incredibly effective for discovering a new potential user bases or demographic.
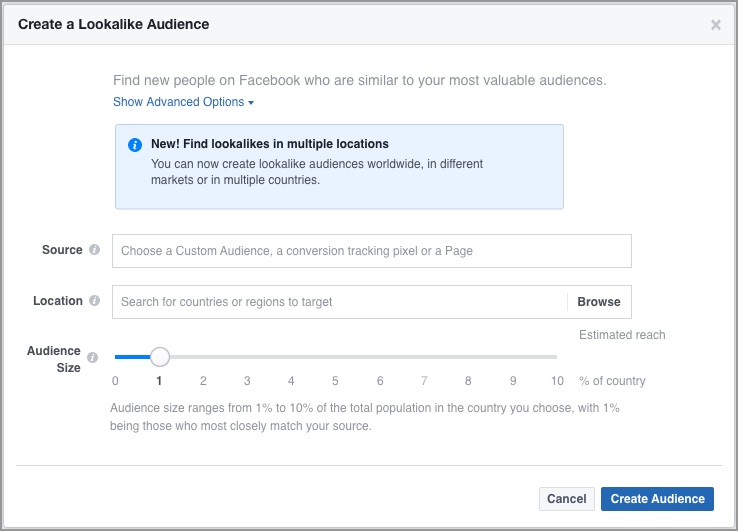
Facebook describes setting up this process as follows:
- Go to your Audiences
- Click the Create Audience dropdown and choose Lookalike Audience

- Choose your source
- Choose the country/countries where you’d like to find a similar set of people
- Choose your desired audience size with the slider
- Click Create Audience
A few things to note here… You can’t edit the audience size after you finish creating your Lookalike Audience. You’ll have to create a new one instead. A source can be a Custom Audience not created with a data partner, your pixel data, your mobile app data or fans of your Page. Consider using a group of 1,000 to 50,000 of your best customers based on lifetime value, transaction value, total order size or engagement.
That’s it! You’re all set up.
Privacy Disclosures
Privacy disclosures are a website’s way of telling the user what type of information they are collecting.
This is definitely something to watch out for depending on where you operate you may have to provide privacy disclosures before setting up retargeting on your site.
California Privacy Disclosure requires that your website details the information you are collecting and whether any third parties will be collecting user data via your website or service.
For more information, Termsfeed has a great article detailing privacy disclosure requirements and best practices.
Conclusion
Facebook retargeting can be a powerful resource for the savvy digital marketer.
Subscribe to our newsletter for weekly insights and marketing know-how.
Error: Contact form not found.
Have questions? Comment below.